
Lesson
Triads are the building blocks of all western harmony. Not only that, but they’re also an incredibly simple and musical way to help you break out of just playing scale patterns, and instead give you harmonically strong ideas.
Not only are they useful, they’re absolutely integral to the way I see the fretboard, and how I teach scales, and soloing. Not knowing them to a high level will slow down your learning, so we have to get this stuff. It doesn’t matter if it takes you a week, a month, or 6. You have to know this stuff cold. You WILL thank me for this down the road.
So let’s talk positions. Are we doing 3nps? CAGED? Nope. Neither.
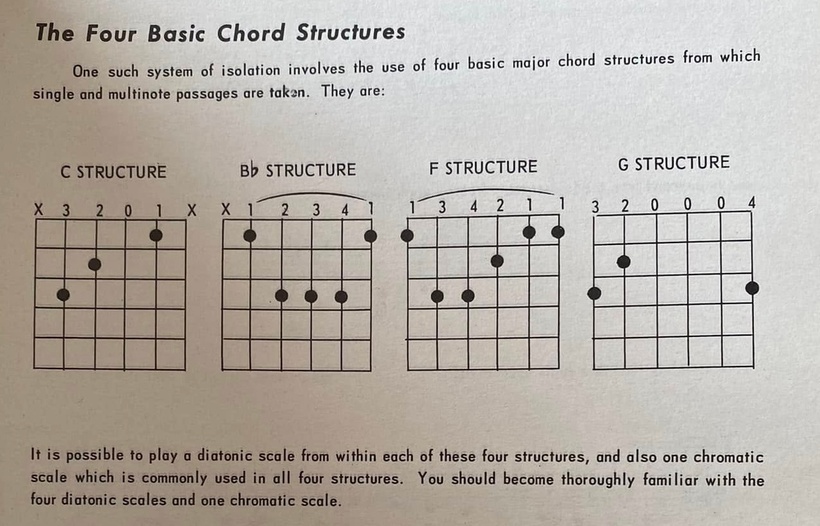
I have a system that’s both comprehensive AND simple. It’s a thing I’ve refined over the years, but more recently I’ve learned that systems like these are DECADES old, they just weren’t widespread. Both Barney Kessel and George Barnes taught a 4 position system in their books.
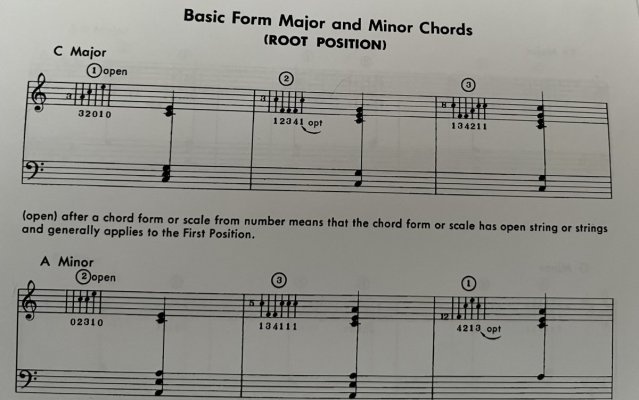
And Johnny Smith worked on a three position system
It’s going to feel like a contradiction to say this, but striking a balance between simplicity and being comprehensive matters. If you have 24 different ways to play any chord, you could end up with option paralysis, not to mention the months it could take to just learn a new chord!
We’re going to start with fewer options so we can focus on playing the music, and then if/when we find that a limitation, we can add to it. But (and I really do mean this) I’ve not got to that point. I know more chords, but I only ever really play these three positions now. But you’ll see just how elegant they are in the next lesson.
So, before dealing in chord voicings, we have to be able to see root notes.
Remember, there’s a downloadable PDF of this, a backing track for the full routine, backing tracks for each chord, along with a gutiar pro file with the backing track synced to it, along with the video of me teaching all this, and playing the full routine!
This system only requires you to look for notes on the E or A string. Just as with the amount of shapes, we can learn the other strings as and when you need them (I cover this extensively in the learning the notes course), but you won’t be able to get by without knowing the E and A strings.
So our first exercise will be playing three octave shapes for G.
We’ll have one at the 3rd fret of the E string. I’ll call that E shape.
One at the 10th fret of the A string played with the 3rd finger, I’ll call that C shape.
And the 10th fret of the A string played with the 1st finger, we’ll call that A shape.
Once we have no problem seeing those, we can add our three chord shapes onto those octave patterns.
I find most students struggle with the C shape, but it’s not because it’s hard, it’s because it’s unfamiliar and you’re using the E and A shapes as a crutch. If Joe Pesci can do it, you can do it!
Once you’ve spent time doing that on G, we’re going to transpose that all to C. Still two root notes, one on the E, one on the 8. This time it’s going to be 3 on the A, and 8 on the E (and then 15 again on the A). Three octave patterns.

Once you can play those without effort, it’s time for putting your chords ontop.
Now move the idea over to D. 5th fret A, and 10th fret E. C shape, A shape, E shape.
And then add chords ontop.

Once you’re comfortable finding those three chords, we’re going to apply them to a D C G chord progression. The skill here is working on seeing the closest option. The only rule here is to never play the same shape twice in a row. Not because there’s anything wrong with it, but because we want to work one all of these chords equally. If you’re playing one shape twice, then you’re neglecting another shape.
C shape A shape E shape

A shape E shape C shape

E shape C shape A shape

Finally, for you more advanced students, I want to work around the circle of 5ths/4ths.
Learn the pattern – C F BEAD G flats BEAD G repeat. Say that over and over…. then
C F Bb Eb Ab Db Gb B E A D G repeat.
There are lots of ways we can lay this out on the fretboard, remember, we’re only looking for root notes on the E or A string.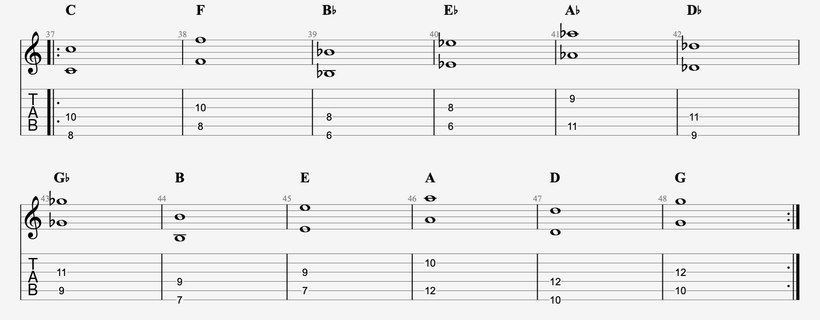
Once you can do it with octave patterns, we can add the chords on top.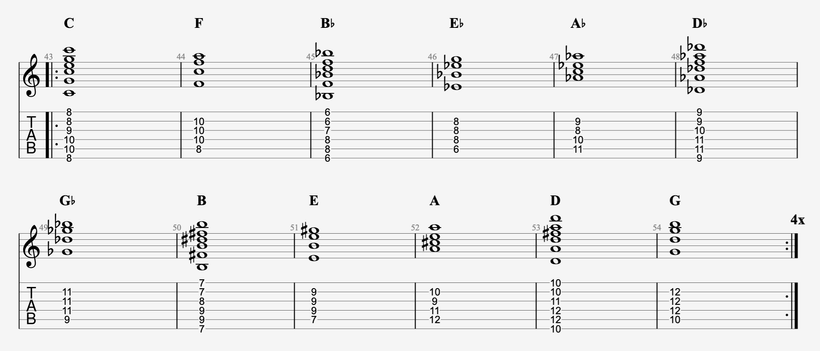
And that’s just one way of doing it. Once you can do that, try starting with the C lower on the neck and working your way through the progression.
As I write this text, it’s April 2025, and I recorded all these videos back in January. Since then I’ve recorded a TON more courses and the approach has adapted as I’ve gone on. This routine playthrough is almost fifteen minutes! On reflection that’s too long and I’ve adjusted that now. But this routine isn’t too hard, so you should be able to get it down. Remember, we have full Soundslice integration, and that should make it easy to skip to the exact part of the routine you want to get to.
Get to work!
Routine

Dear Levi, love your stuff, followed you for a while but this is the closest I’ve got to committing.
Did you conciously select a guitar with only a single fret marker for this demonstration?
If so disregard this comment: I find it very surprising that experienced teachers with more than a decade behind them and a good amount of online content, still don’t realise that watching a good player fret notes without some other visual support is very hard to register the note actually being played. The swiftness and deftness of touch, plus the fact the viewpoint is reversed and inverted to what I see and it’s over in a flash. Fret markers sub-divide the amount of frets to count, in that nano-second. Its fine if you already know where the note is going but then you probably don’t need the lesson. I wish there was a way to overlay each note with its name (letter) as it is played.
hey Pete – it’s actually a conscious decision believe it or not! I obviously get where you’re coming from, but my WHOLE schtick is ear training. The amount of times in 1:1 lessons I have to hide my neck from the student because they’re not listening, they’re looking is wild. I know I’m making videos, so you’re going to be able to see, but yeah… I don’t want you listening with your eyes. It might feel easier that way and so you default to it, but I should be able to blur the screen and you follow along still, that’s where the skill is. Ear and understanding! Connect those two things and you’ll be unstoppable!
Hello Levi, although I’m not a member yet, I thought I’d check out your sample routines. Looks great! I know that the SoundSlice integration is part of becoming a member, so should I assume that the PDF, GP files, and MP3s are all a part of being a member as well (it’s mentioned in the text above)? Also, I don’t know if you have CC for the talking videos in your routines, but that would be useful, because there are certain points in the video where the audio is muffled. It could be that your noise reduction/gate effect is cutting too much or too close. I might be alone in that, but I thought it would be worth sharing. I’m super exited by the possibilities of this website and I’m going to check out the rest of the sample routines!
yes, all downloads for members – and audio is a bit cleaner now! Early days we had some issues!
I love the idea of guided practice and getting these things down after playing the same cowboy chords and barre chords for 30 years, but to be honest, you lost me REALLY fast. I couldn’t tell exactly what you were fingering and some of the fingerings I just couldn’t do like the G chord using your thumb. This was the first sample lesson and a couple minutes in and you have already lost me.
Sorry to hear that Shane! I’m not going to try and explain it to you if you’ve already made your mind up, but I wish you luck!