Hybrid picking for beginners starts with just two things: your pick and your middle finger. Hold an open C chord, keep the pick resting on the A string and pluck a higher string with your middle finger, then alternate the two slowly until your hand stays completely still. Once that feels natural, you move the same idea across string pairs and up the neck through a few chord shapes. That’s the whole first routine, and it’s five exercises long.
This is how I start the Hybrid Picking course, and below are the exact exercises from that first lesson, in order, with what to watch for in each one.
Why bother with hybrid picking?
Hybrid picking gets lumped in with country guitar, and it’s great for country, but the main reason I use it is much simpler than any style: string crossing. Think of something like Jason Becker playing “Air,” or some of Eric Johnson’s string-crossing lines. It’s far easier to pluck that high E string with your middle finger than to pick every note and jump the pick back and forth across the strings.
So that’s the job. The pick handles one string, the finger handles another, and suddenly those awkward string skips stop being awkward.
There’s a sound to it as well. Hybrid picking is a bit more “clucky” than straight picking, for lack of a better word. When your middle finger comes back down to pluck, it tends to touch and mute the strings around it, so the notes get a natural little cutoff. Some players fight that. I’d learn to like it, because it’s half the charm.
How to hold your hand for hybrid picking
Before you play a note, here’s what matters most in this whole lesson.
Keep the hand fixed
When you pluck with the middle finger, the pick stays where it is. In the first exercise my pick is literally still resting on the A string while the finger plucks. Nothing moves. That fixed hand is the thing you’re practicing. Later, when you’re playing faster, you won’t need to rest the pick on the string every time. That’s just there to show you that your hand could stay put.
Pluck, don’t scrape
Don’t drag your finger across the string, and don’t dig in so hard that the note snaps. You’re after a natural-sounding note that you could play soft or loud. You can play aggressively later if you want to. Right now we’re building control.
Move from the thumb and fingers, not the wrist
If you watch my picking hand closely, the motion for the picked notes comes from the thumb and fingers, not from turning the wrist. And the finger motion is a closing of the hand, not lifting the hand up. If the whole wrist is swinging around, your middle finger never knows where the string is going to be.
The five exercises from Routine 1
Everything here is built on an open C chord, with the backing track sitting on C for the whole routine. Hold the chord shape with your fretting hand and let your picking hand do the learning.
Exercise 1: Pick and middle finger on two strings

Take the bottom two notes of the C chord, C on the A string and E on the D string. The exercise starts with a pluck from the middle finger on the D string, then the pick plays the A string, back and forth. Then the finger moves over to the G string while the pick stays on the A string.
You’ll notice the A and G strings sound a bit different from the A and D. That’s normal. Take it nice and slow first, then build up speed.
Exercise 2: Middle finger across the D, G and B strings

The pick stays on the A string, and now the middle finger moves between the D, G and B strings. Find a tempo where this feels comfortable, then nudge it up.
Here’s a little twist worth trying. As written, the finger plays on the downbeat: one and two and. You can flip it so the pick lands on the downbeat instead. It’s functionally the same exercise, but where you feel the beat changes, and it’s good to be comfortable both ways.
Once it feels easy, try it on any other chord. Grab an E chord and do the same thing. You’re building the flexibility to pick like this anywhere.
Exercise 2
Here I play Exercise 2 over the open C chord with the pick parked on the A string and the middle finger on the D, G and B strings, then flip it so the pick lands on the downbeat (from Lesson & Routine 1: Pick and Middle Finger).
Starting to move
The first two exercises keep the pick parked on one string. The next three ask the pick to travel, which is where it starts to feel awkward. That’s exactly why they’re in here.
Exercise 3: A and G strings through three C voicings
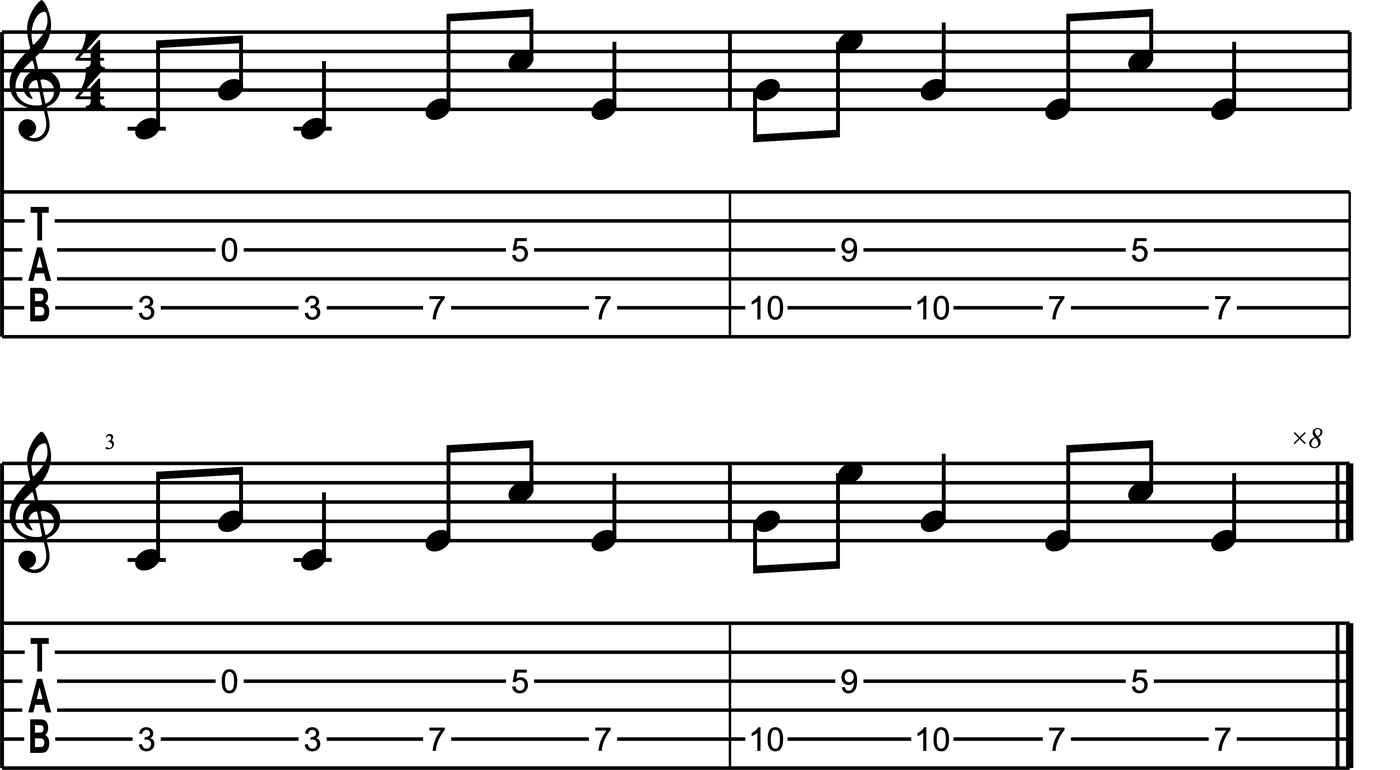
Now we bring in some triad knowledge. Start on the open C shape, then move up to the A shape voicing, then the E shape voicing. On each one you only play the A string, the G string, then the A string again: pick, finger, pick.
This is really a chord exercise in disguise. Your picking hand is doing something simple, so your attention can go to seeing the C chord up the neck.
Want it to sound more country? Move your picking hand in toward the bridge, or add a bit of palm muting. That’s another reason hybrid picking works so well in country: because the hand stays fixed and the wrist isn’t moving, palm muting is easy, and you get that chunky sound.
Exercise 4: String pairs across an open C chord
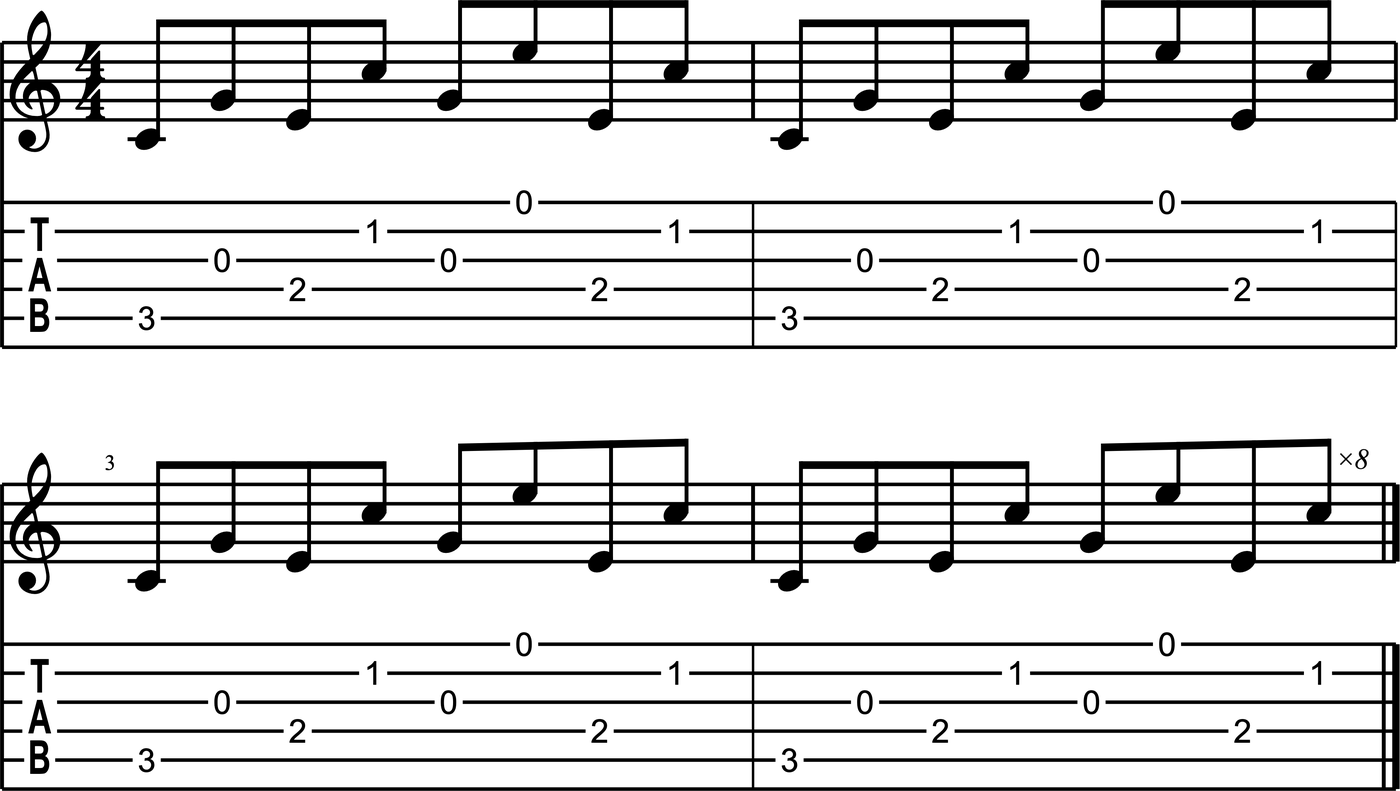
Back to the open C chord, and now we arpeggiate two-string pairs: the A and G strings, then the D and B strings, then the G and high E strings. The pick always takes the lower string and the finger takes the string two over. I like to keep a little palm mute on this one.
The pick is moving across the strings now, so this can feel quite awkward. Go very slowly. I’m a big believer that if you can talk while you’re doing it, you’ve got it down. What you’re really learning is the exact distance of that string skip, so your finger lands without looking.
Exercise 5: Skipping strings through C voicings up to the 17th fret
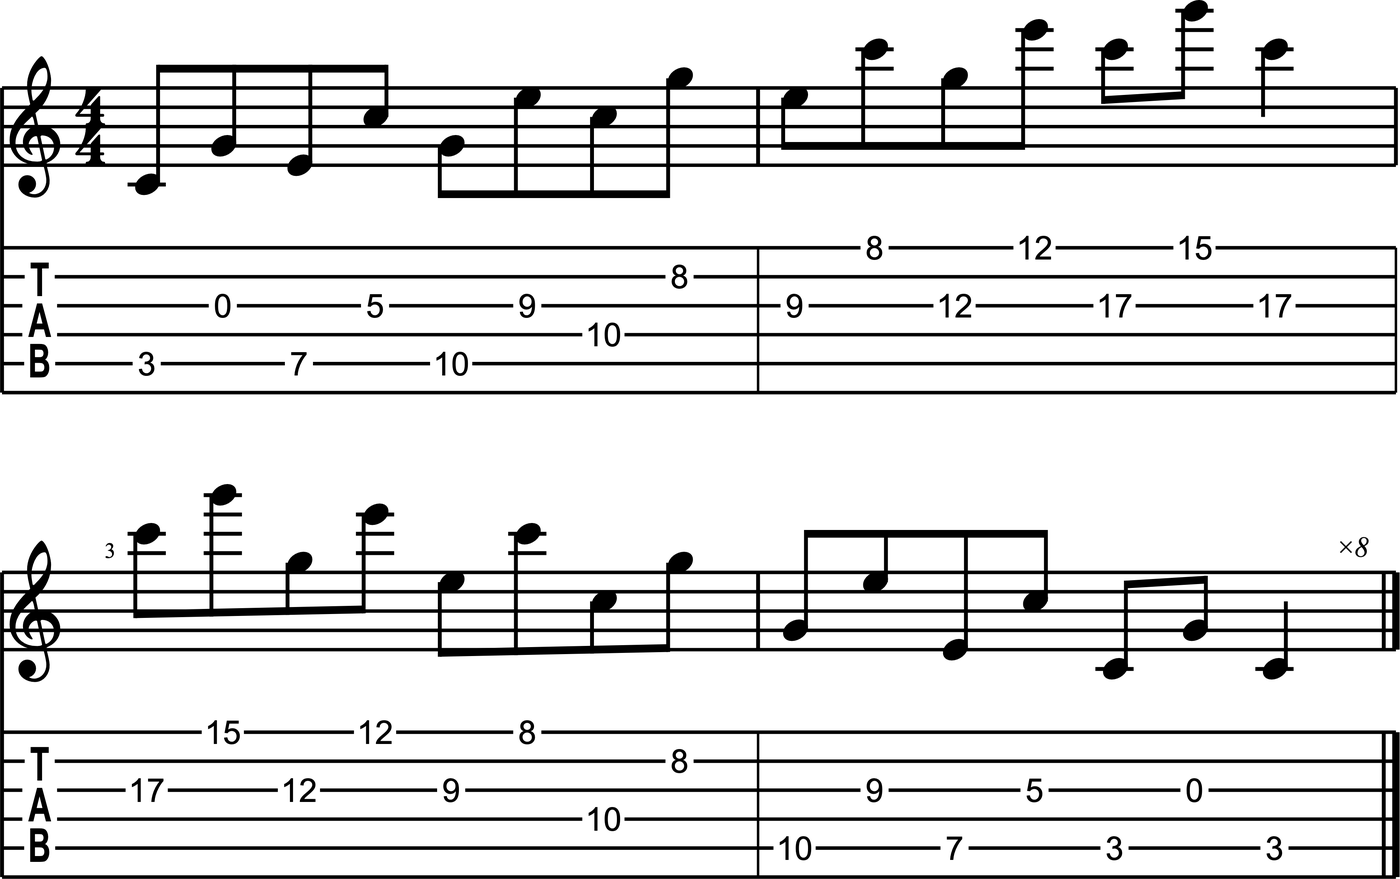
The last one combines everything. We’re still skipping a string each time, but now we walk through more triad voicings: C shape, A shape, E shape on the lower strings, then over to the D and B strings, then up to the top string set, the C shape and finally the A shape, all the way to the 17th fret. You only play the low note and the high note of each voicing, then come back down.
This is two skills at once: the hybrid picking motion, and moving it between chord positions. In theory you can apply it to any chord. Try it on G and you’ll see what I mean.
How to practice hybrid picking for beginners
- Start without the backing track if you need to. The routine has two tracks, a slower one at about 110 bpm and a faster one in the mid-130s. You don’t have to use either at first. Take your time getting comfortable with the motion.
- Remember it’s only eighth notes. The faster tempo might look fast on paper, but you’re only playing eighth notes, so it isn’t pushing you too hard.
- Short and regular wins. At tempo the whole routine comes in at about five minutes. That’s an easy thing to run every day before you play anything else.
- Want more speed later? Go back with a metronome and push the tempo up. The exercises don’t change; your control does.
- Get creative. There are endless ways to practice this. Once the five exercises feel easy, take the same pick-and-finger idea to any chord you know.
Where to go next
Pick and middle finger is the foundation. From here the course moves on to chord progressions, the pinch technique, “alternate picking” with the pick and fingers, adding the ring finger, the forward roll, Travis picking and adding the pinky finger, and then puts it all together.
If country is what brought you to hybrid picking, two good next stops are the major pentatonic scale with the country ♭3, and cross picking, which tackles the same string-crossing problem with the pick alone.
This first lesson and routine is from Hybrid Picking, my course on using the pick and your fingers together for pinches, rolls and cleaner string changes. It’s 9 guided routines where you press play and practice along with me, and it’s all part of a GPR membership too.