The fastest way to learn major triads on guitar is to start with just three shapes, the E, C and A shapes, and find every one of them from a root note on the low E or A string. Practice them slowly in one key, then two more, then all 12, and within a few weeks you can find any major chord anywhere on the neck without thinking about it.
That’s the routine I start every student on, whatever they play. Here it is, step by step, with the exact exercises from the lesson.
Why I teach triads first
I’ve been teaching guitar for over 20 years, and triads are how I see the whole fretboard. My pentatonics, scales, licks and arpeggios all hang off them, and that’s just as true when I’m playing jazz as it is with country, soul or blues. Learn the triads properly and everything else has somewhere to live.
The catch is that this stuff looks easy. Players give it a few days, think “this isn’t too hard,” and move on. Months later the fretboard still feels like a maze, because the shapes never became automatic. The fix isn’t more information. It’s a few minutes a day on the right exercise until there’s nothing left to think about.
What you need before you start
Just one thing: the note names on the low E and A strings. Every root in this routine sits on one of those two strings, so the better you know them, the faster this goes. You can still work through the routine while you’re learning them, and it’ll help them stick.
The three positions: E shape, C shape and A shape
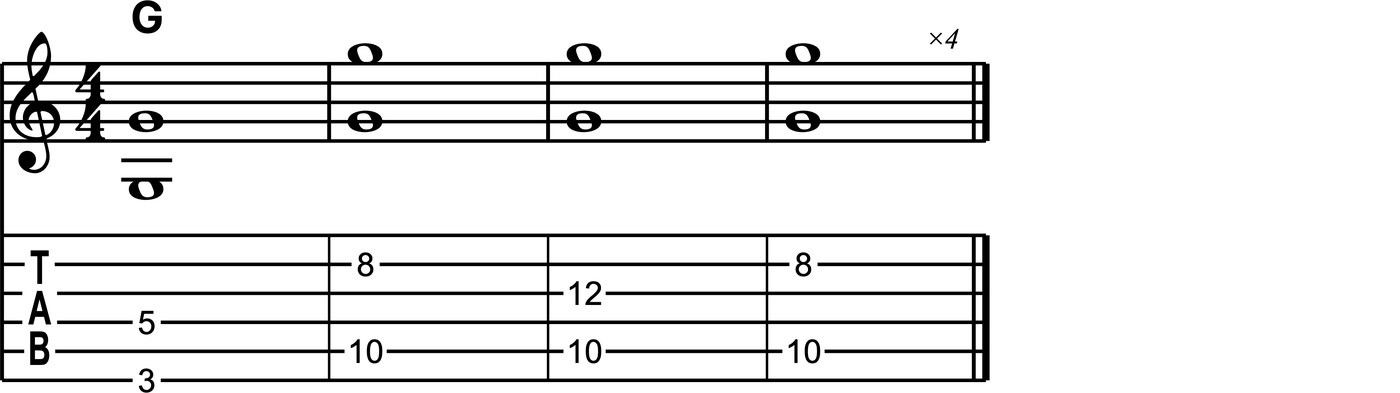
We’ll start in G and play only the root and its octave. These octave shapes are the skeleton of each chord, and they’re what your eyes should look for on the neck.

The three G major shapes: E shape, C shape and A shape.
- E shape: the G on the low E string, 3rd fret, with its octave two strings over.
- C shape: the G on the A string, 10th fret. Reach it with your 3rd finger, not your index.
- A shape: the same G on the A string, now under your index finger.
Play up through the three positions and back down again. Strum them, use pick and finger (the start of hybrid picking), or thumb and finger. It doesn’t matter, because this is about seeing the neck, not technique.
Exercise 1: G octave shapes
Fill in the chords
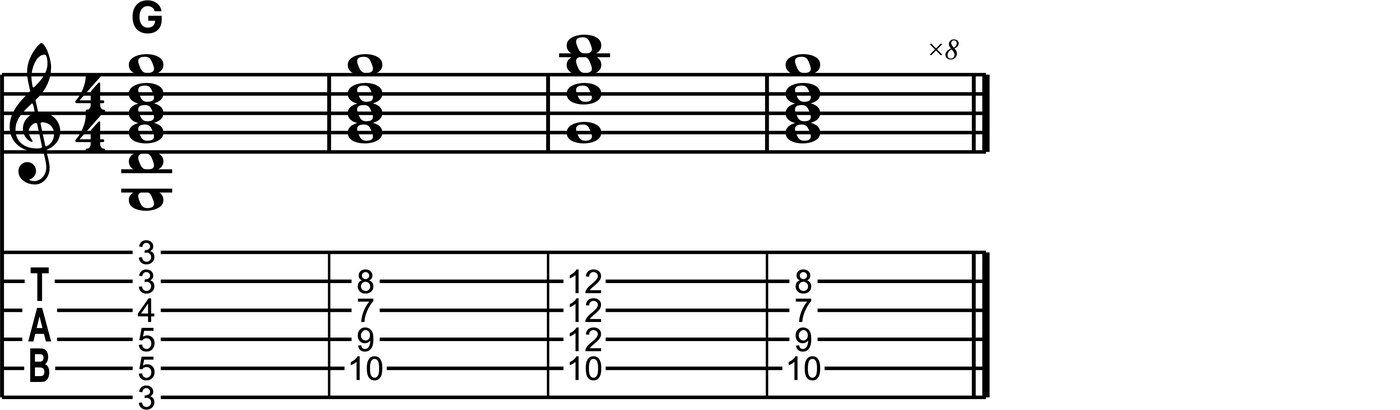
Same positions, full chords this time. You probably know all three already. If you play the E shape higher up the neck, you can drop the barre and use your thumb over the top on the D, G and B strings. Have both versions under your fingers. Being able to do whatever the moment needs is what makes a player bulletproof.
For the C shape, keep your palm relaxed against the back of the neck rather than reaching around with tension. Then play E shape, C shape, A shape, C shape, round and round.
Exercise 2: G chords in three shapes
Exercise 2
Here I play the G major chords from Exercise 2 along with the routine at 90 bpm: E shape, C shape, A shape, C shape, one shape per bar (from the Major Triads routine).
Move it to C and D
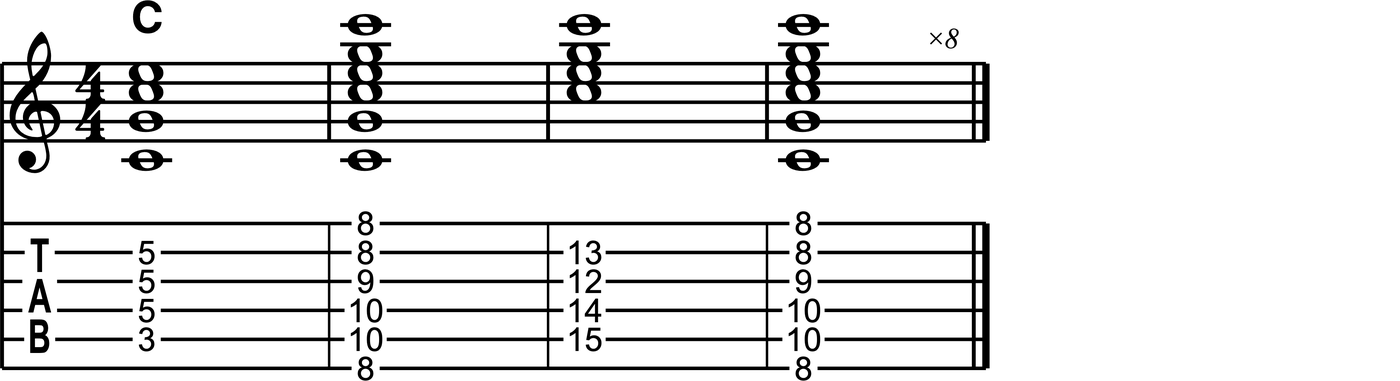
Now the same thing in C. There are still only two roots to find: the 3rd fret of the A string and the 8th fret of the low E string, plus the C up at the 15th. Octave shape first, then the chord, in all three positions.
Exercise 4: C chords in three shapes
Then do it in D, with roots at the 5th fret of the A string and the 10th fret of the low E. By now you’ll notice the order of the shapes changes from key to key, but the shapes themselves never do.
Put it to work: D, C, G
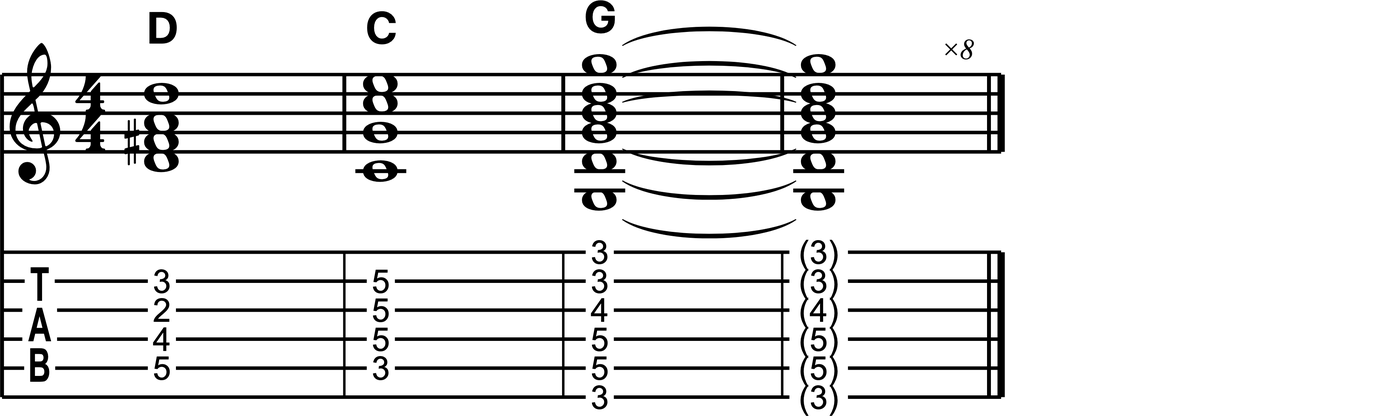
Here’s where it turns into music. D, C, G is the progression behind Sweet Home Alabama and Sweet Child O’ Mine, and we’ll play it three times, starting from each of the three D shapes.
There’s one rule: never play the same shape twice in a row. Sliding an A shape down for the next chord isn’t wrong, but it lets you skip the shape you’re weakest at, and for most people that’s the C shape. Make yourself use it.
Exercise 7: D, C, G without repeating a shape
Take it through all 12 keys
Once that feels comfortable, take the octave shapes, and then the full chords, through all 12 keys. We go around the circle of fifths backward, so each move is up a fourth:
C, F, B♭, E♭, A♭, D♭, G♭, B, E, A, D, G, and back to C.
An easy way to remember it is “C, F, then BEAD-G twice”: first with flats (B♭, E♭, A♭, D♭, G♭), then without (B, E, A, D, G). Twelve moves and you’ve played every major chord there is.
Exercise 11: all 12 keys around the circle of fifths

If that’s easy, start the cycle in a different place on the neck. The goal is that when a chord comes up in a song, you never think “where is that again?” You just see it.
How to practice major triads on guitar
- Go slowly. The routine sits at 90 bpm with one shape per bar. That’s deliberate, because the time between chords is when your brain does the work.
- Look ahead. Before your hand moves, look up the neck at the root you’re heading to. Your eyes lead and your hand follows. That habit is what turns three shapes into a map of the whole fretboard.
- Don’t skip it because it feels easy. I have students who have been with me for months and still haven’t nailed these foundations, because they gave them a few days, found them simple and moved on. Never underestimate rock-solid basics.
- A few minutes every day beats an hour once a week. Short, regular sessions are what make the shapes automatic.
This is the very first routine in Triad Mastery, my complete triad system: 13+ hours of lessons, 33 guided practice routines and 10 musical etudes. Each one is a routine you press play on and practice along with me, and it’s all part of a GPR membership too.
Once these shapes are automatic, the same thinking carries straight into shell voicings for 7th chords and into hearing the modes, like the Mixolydian mode in three shapes.