The best way to learn the notes on the fretboard is to start small: just the low E and A strings, learned from things you already know, like the root of a G chord or the A minor pentatonic box. Say each note’s name before you play it, never after. Then put it straight into music by playing the root notes of a real chord progression across those two strings. Do that a few minutes a day and you stop working notes out. You just see them.
That’s exactly how I teach it. Here are my three quick tips, then a short etude to put them to work, with the exercises straight from the routine.
Be honest: do you know the fretboard?
Learning the notes is one of those boring jobs most of us promise ourselves we’ll get to, and it never really happens. You can play the shapes and the licks, but if someone asks “what note is that?”, there’s a pause.
Here’s the bar I’m aiming for. A good friend of mine put it like this: when you see a sheep in a field, you don’t think “it looks like a cow, but smaller and woolly, so it must be a sheep.” You just say “sheep.” It has to be the same on the guitar. If you’re working notes out, the moment you needed the answer has already gone.
The good news is you don’t need to learn all six strings to get there. And you definitely don’t need a poster.
Tip 1: Ditch the poster and start with the E and A strings
I’m not a fan of the big fretboard poster on the wall. It feels like a nice reference, but it becomes a massive crutch. Every time you need a note you look at the wall, so you never actually learn it.
So start with just two strings: the low E and the A. I call this the bottom-up approach. Your bass notes live on those two strings, and on top of them you see your octave patterns, chord shapes, arpeggios and melodies. If you’ve worked through my three triad shapes, you already know every one of them is found from a root on the E or A string. Same with shell voicings. If that’s all you ever develop on the guitar, you’ll get by absolutely fine.
Tip 2: Learn new notes from the ones you already know
Rather than brute-forcing a list of names, I want you to use references you already have at your disposal. You know the open low E is an E, because you tune it to E. So the 12th fret, an octave higher, is also an E. Now look at the chords you already play:
- G: the root of your G major chord is the 3rd fret, so that’s G.
- F: the root of an F major chord is the 1st fret, so that’s F.
- A: the A minor pentatonic box starts at the 5th fret, so that’s A.
- D: the note just before E is D, two frets below the 12th, at the 10th.
- C and B: a C major chord at the 8th fret gives you C, and B sits just below it at the 7th.
The A string works the same way. The open string is A. The 3rd fret is the root of your open C chord. The 7th fret is an E (I know that one from a youth spent playing thrash metal). The 2nd fret is the root of the B7 chord you’ve played in a hundred blues tunes. Fill in the rest from there, and learn the A string as its own thing, not as “the E string but different.”
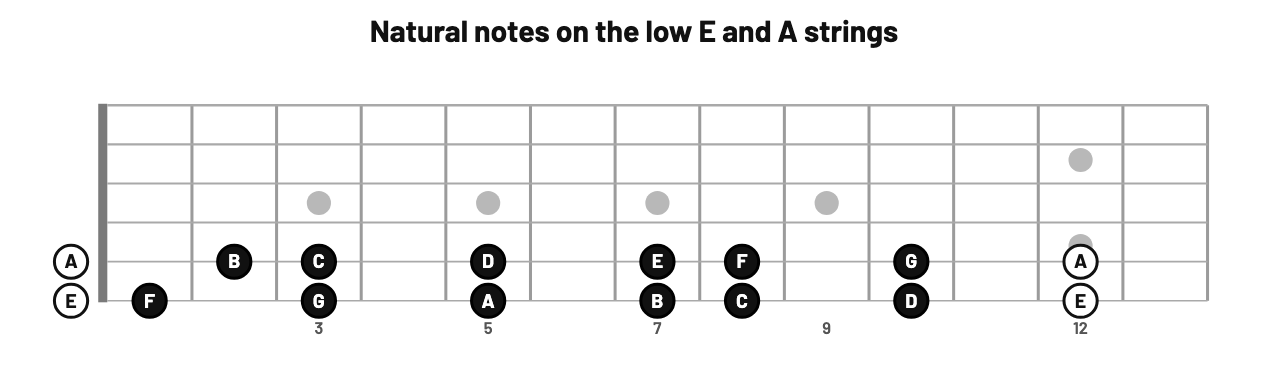
The natural notes (the white keys on a piano) on the low E and A strings, from the open string to the 12th fret.
Two gaps to remember: E to F and B to C are always one fret. Every other pair of natural notes is two frets apart.
Sharps and flats: if this, therefore this
Once the natural notes are solid, the sharps and flats come for free. A sharp raises a note one fret, a flat lowers it one fret. If I know where F is, I know where F♯ is. I call this “if this, therefore this,” and it means you memorize less, because you derive what you need from what you already know.
Tip 3: Say it, then play it
When you run through those notes, say the name first, then play it. Don’t play a note and then say what it was. I want you in the mindset of thinking about the note you’re going to play before you play it. Next I need G. Where’s G? Why do I know it? Because of my G chord.
In the course I run this as two exercises. In Say It, Play It, I call out a note name and you find it. In Play It, Say It, I give you a fret and you name the note. Use one finger over the top of the neck if you like, because this isn’t about fretting technique. It’s pure visualization.
And try it with your eyes closed. The guitar I use in these lessons has no fret markers, and that’s partly on purpose: I don’t want you relying on your eyes.
Put it to work: the As etude
Knowing notes in a drill is one thing. Finding them while the music keeps moving is the skill that matters. So to finish level one of the course I wrote five short etudes on Stevie Wonder tunes, where you play just the root notes of the chords.
The first one hasn’t been disguised very well. It’s called As, and it’s based on the chorus of “As” from Songs in the Key of Life. The progression is G♯m, D♯7/A♯, G♯m/B and C♯, two chords per bar. Those slash chords just tell you the bass note: D♯7/A♯ is a D♯7 chord with A♯ in the bass. You don’t need any of the chord voicings here. Your only job is the bass line, and it simply climbs: G♯, A♯, B, C♯.
Each exercise is four bars at 100 bpm, and you play each one 8 times.
Exercise 1: the As bass line on the low E string
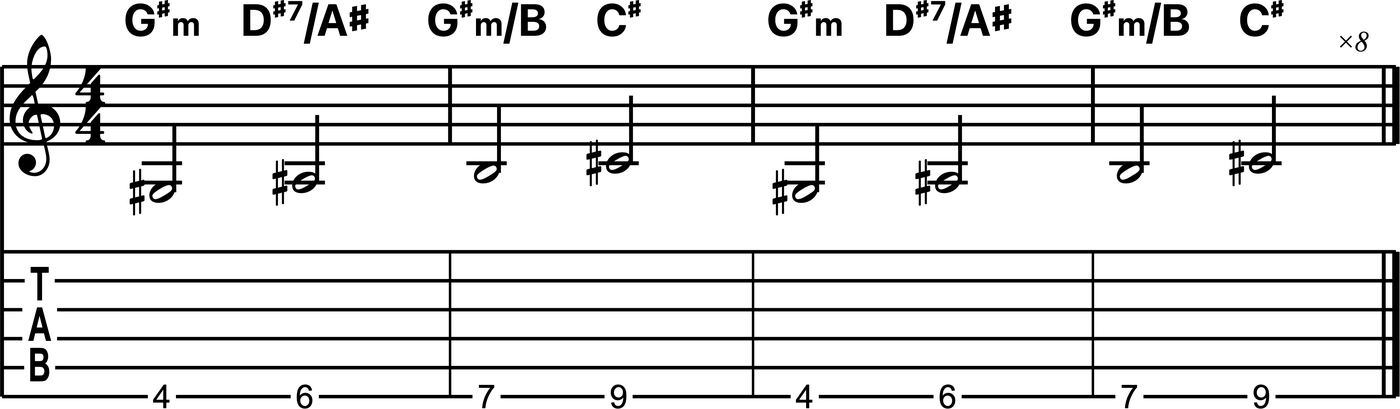
Where is G♯? 4th fret. A♯? 6th. B? 7th. C♯? 9th. Not too tricky, and every one of them hangs off a natural note you already know.
Exercise 2: the same line on the A string
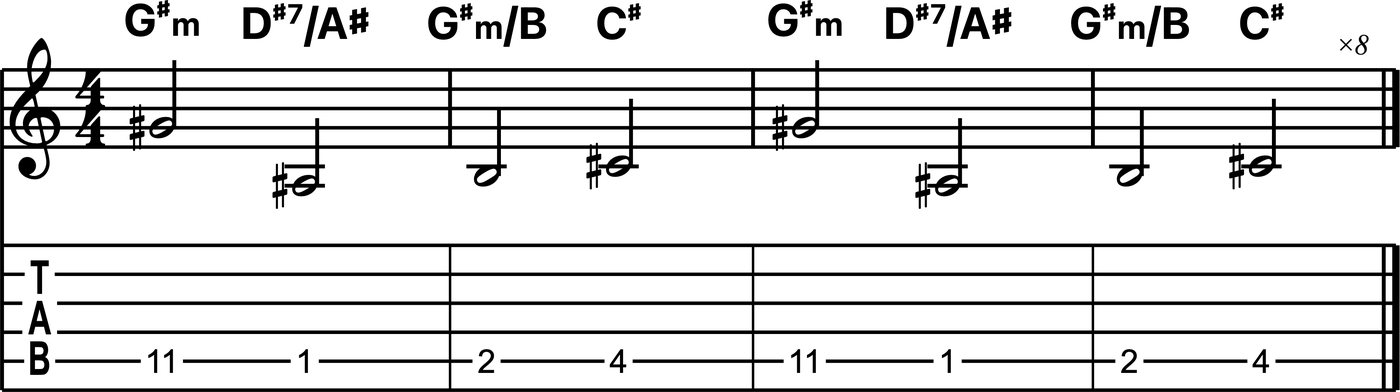
Now G♯ is up at the 11th fret, and A♯, B and C♯ are down at the 1st, 2nd and 4th. That’s a huge jump, which is why the next two exercises combine the strings.
Exercise 3: combine the strings, starting on the E string
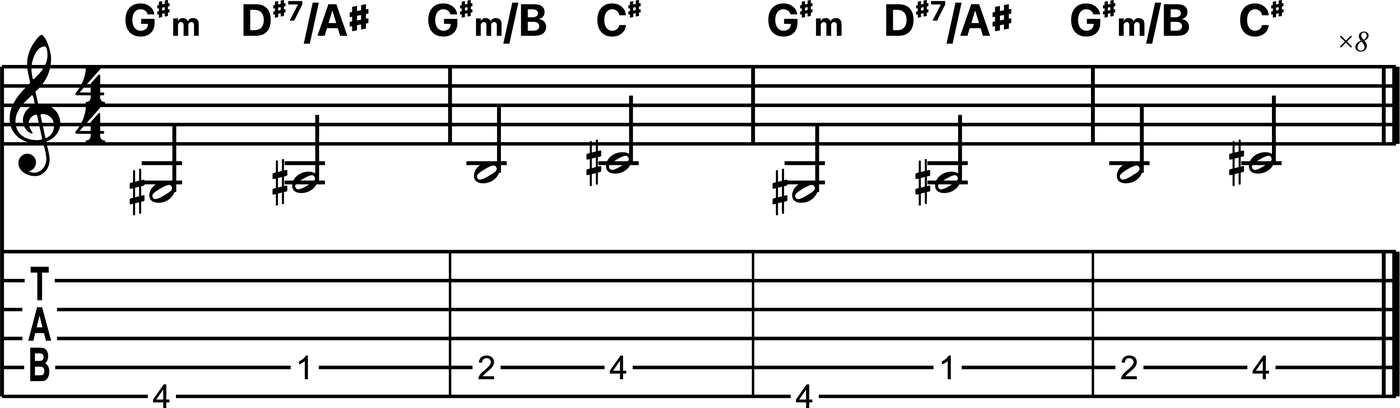
Start on G♯ at the 4th fret of the low E, then move over to the A string for A♯, B and C♯. Your hand can stay in one place for the whole progression.
Exercise 3
Here I play the As bass line along with the routine at 100 bpm, G♯ on the low E string, then A♯, B and C♯ on the A string, without moving my hand (from the As routine in Learning The Notes).
Exercise 4: combine the strings, starting on the A string
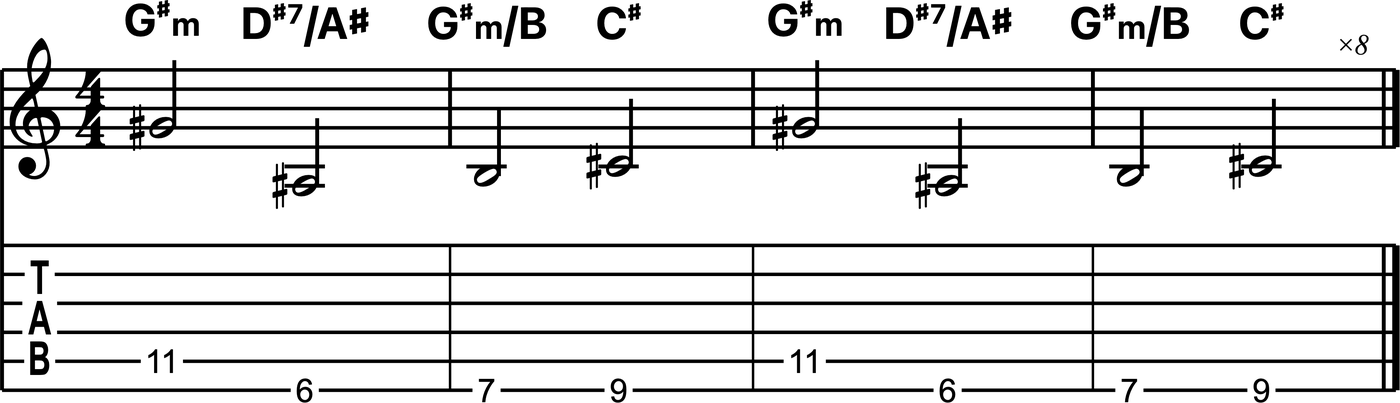
This time play G♯ high up on the A string at the 11th fret. Rather than jumping all the way down to the 1st fret for A♯, drop to the low E string at the 6th fret, then B at the 7th and C♯ at the 9th. Same notes, a different place on the neck.
How to learn the notes on the fretboard for good
- Look ahead. The real skill is seeing the next chord, knowing its root, and finding it on the neck before you need to play it. Don’t focus on where you are. Focus on where you’re going.
- Play each exercise 8 times. E string, then A string, then the two combined versions. That’s the whole routine.
- Say the note names out loud as you play them, at least for the first few reps.
- Come back regularly. Say It, Play It gets easier every time you do it. A few minutes most days beats one long session a month.
- Then add the other strings. Once the E and A strings are automatic, move on to the D, G, B and high E.
If you want somewhere to use your new bass notes straight away, try moving the minor pentatonic to a different root, or find the root for the Mixolydian mode on either string. Every one of those starts with knowing where the note is.
The full As routine, the other four Stevie Wonder etudes and all 51 routines in Learning The Notes are part of a GPR membership, and you can try it free for 14 days.